Flash Techniques - Ben Connolly
Flash, and more specifically off-camera flash has completely changed photography and the look of photographs in the past few years. With improved technology, the quality, efficiency and speed of modern speed lights and triggers have provided creative photographers with a whole new range of possibilities.
We are no longer limited to the sun, constant lights or big studio lights and are now free to whip out a speed light and rise to a new level of creative potential.
The techniques I'm going to share with you are applicable in almost any situation. They are not too technical in nature and they are how I use on and off camera flash, modifiers, reflectors and literally anywhere I can bounce light off to creatively show the potential of any situation I'm in.
Correct use of on and off camera flash does require a pretty clear understanding on the technical aspects of both photography and lighting but with that said some of my best and most favourite photographs have been created by simply breaking the odd rule and “doing it my way.” Conforming to the known rules of lighting and creating shadow will always give you great results but what if you need something more? What if you want to take a bold leap out of that nice comfort zone you’re in? I'm going to show you a few ways how!

The Gear
First up, I'll share with you what's in my bag and what goes with me to every wedding.
Cameras:
• 2 x Canon 1DX Mark ii bodies
• 1 X Canon 5D Mark iii body (spare)
Lenses:
• 16-35mm F/2.8
• 50mm F/1.4
• 24-70mm F/2.8
• 85mm F/1.4
• 100mm Macro F/2.8
• 70-200mm F/2.8 ii

Flashes:
• 3 x Profoto A1 Speed lights
• 1 x Canon 580EX ii Speed light Modifiers:
• Selens magnetic Grids x4
• Selens colour gels
• Profoto A1 Diffuser
• Profoto A1 Sphere Diffuser
Accessories:
• Profoto TTL-C Air Remote (The BEST system I have ever used)
• 2 x Lightstands (I only use these when I don’t have an assistant)
• 1 x Manfrotto tripod
• 3 x Fractal Filters Prisms
• 1 x high intensity 1500 lumen led torch
• 1 x LED Blacklight
• 2 x Westcott Ice lights
• 2 x 5 in 1 reflectors (1 omega reflector - large & 1 round one - small, in my bag)
While this looks like a huge list, it's actually a pretty standard wedding kit, all of it fits nicely into my Think Tank Airport Security V3.0 Roller bag with the exception of my stands and tripod.
MY STYLE
A wedding day is fast paced so I try to avoid anything that will slow me down or is not useful enough to earn its keep in my bag.
I really only carry my 4 Selens grids some coloured gel filters for the grids, my icelight, torch, small 5 in 1 reflector and Profoto TTL-C Air remote in my bag and all of these items generally get utilised every wedding.
I don’t normally use any light stands unless I don’t have my assistant with me on the day. I am a frequent user of high-speed sync to better control ambient exposure and rear curtain sync for long exposure images. (These two functions are really important to learn)

GETTING IT TO ALL HAPPEN TOGETHER
The number one rule in my humble opinion, when using any introduced light source, be it flash, led light etc is to... EXPOSE FOR THE AMBIENCE FIRST THEN ADD YOUR LIGHT
By doing this and then dialling in your light source to correctly illuminate your subject will normally always give you the best result and show off the beautiful colours of your scene unless you’re going for lighting that is really creative or out of the ordinary.
Just remember your camera has its limitations and what you see in your mind may not always be possible in camera, but if you get it as close as possible to your vision then Photoshop is your next amazing tool to really polish and enhance your photo.
When I am looking for a shot I see light, shadow, color, contrast and my background and when I am thinking about what to do with all those elements I am thinking about creativity, visual impact and the relationship between the subject and the scene, ie: I need to give them a reason to be there.
CREATING THE SCENE
I like to think of my ambient exposure and my introduced light exposure as two separate things that I adjust in two steps. First I will set my scene by finding the ambient exposure and composition, once I have worked out the ambient exposure and decided on my composition. I will bring the subject in and work out the introduced light exposure.
This allows for two things, first I can better manage complicated shots by simply adjusting two settings, therefore simplifying the process, and second I can set up my shot, figure everything out and then bring the subject into the frame to save time and not have them getting bored standing around waiting for me to get my settings right.
Remember pre-visualising your shots or storyboarding is a really great way to ensure you don’t get overwhelmed on the day and run out of ideas. Nobody likes a stressed and flustered photographer at their wedding, that doesn’t install confidence at all so be prepared
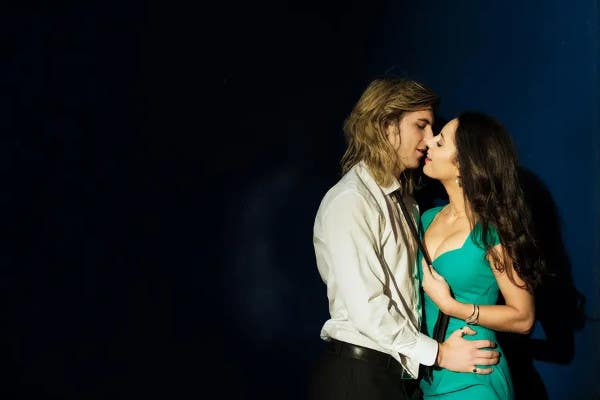
01. Highlighting Against Shadow To Isolate Your Subject
This one is about as basic as it gets. Remember that the camera only sees in light, shadow, colour, and contrast. I will often look for the darkest area in my scene and try to underexpose to the point where it goes dark enough to frame my subject in. This does two things, one it allows the couple to really stand out against the background and two it simplifies the overall scene making the image much more visually stimulating.
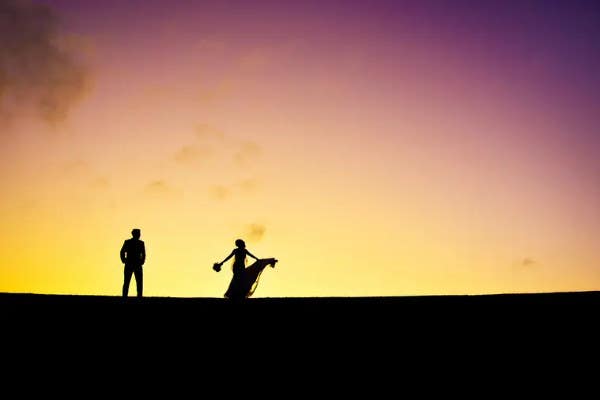
02. Silhouetting Against Highlights
Similar to highlighting against a shadow, this is using shadow against a highlight. In the shot below I didn’t need flash because I had the sky but night time situations using the flash will give you a similar result. In the case of flash, I create that highlight by using a flash positioned behind the subject and illuminating something behind them or pointed at them directly. For these shots I will usually look for a dark and simple area to silhouette against to maximise contrast, I will also often times gel the flash a contrasting colour to maximise colour impact.
03. White Balance Creativity
This is when I use white balance and coloured gels to my advantage to trick the camera into introducing more colour into the scene. Usually, I’ll put an orange gel on the flash, then set the cameras white balance to counteract the orange gel by introducing more blue to the scene. The end result is a neutral coloured flash but a blue ambient light. You can also do this the opposite way by putting a blue gel on your flash and setting the camera’s white balance to correct for the blue coloured flash by introducing more orange into the scene.

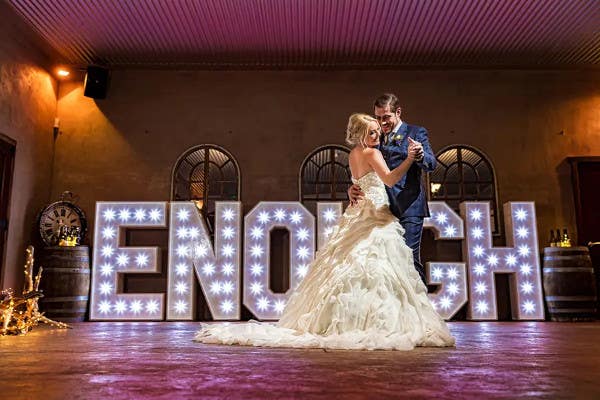
04. Dragging Your Shutter
Dragging your shutter is when you use a longer than normal shutter speed to allow for motion blur. That means you can freeze your subject while letting the rest of your frame blur. This particular style is really great for wedding receptions where everyone is dancing and you have a beautiful ambience in the room. The way to achieve this look is to setting your flash to rear curtain sync and utilising a slower than normal shutter speed to capture motion. I tend to use a shutter speed of between 1sec - 1/60 sec and a couple of speed lights for dance floor situations. It takes a little trial and error to get it right but remember, when you think you have it right zoom into your photo to be 100% sure its sharp. Then your good to go!
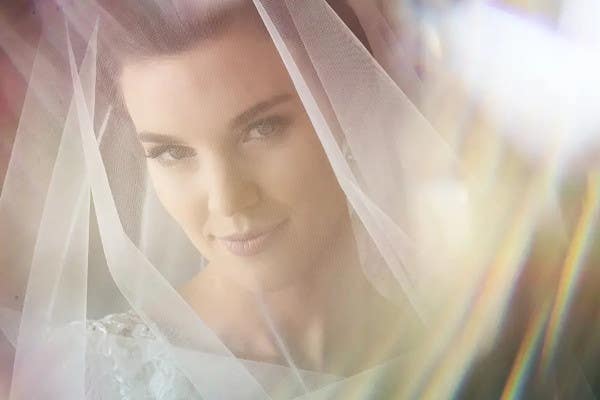
05. Shoot Through Lights
I shoot through lights often to frame my subject and show a beautiful bokeh effect. Usually, when I shoot through something I am either looking for already lit items like candles, twinkle lights or fire and I will then light my subjects using another flash. Things like wine glasses, sparkly table decorations and Fractal Filters give a really interesting effect. I mostly use shoot throughs when 1. The venue is a little boring and I need an interesting shot, or 2. I want to simplify my frame as much as possible by hiding things I can't move and using the light to frame my subjects


06. Backlighting & Illuminating Particles, rain etc.
Backlighting is when you put a flash behind your subject to illuminate them from behind, I do this often to highlight particles like rain, hairspray, smoke, fog, or bugs here in Australia. The method for this kind of shot is pretty easy, you simply place the flash about 6 feet behind your subjects, if its a bride and groom place the flash at around the grooms shoulder height and pointed at the groom more so than the bride then just slightly move the groom forward about an inch so that the light bounces off him to illuminate her. If you do it the other way the light will bounce off her white dress and really overexpose both subjects.
07. Reflections
Reflections are a great way to add interest and impact to a photo and in fact, some reflections shots can only be achieved with the use of flash or introduced light. Some types of reflections are: "Outside looking in", This is when you are outside looking through a window at what is going on inside and the subject is in front of you. "Reflecting the scene in front of you", for instance, a window beside you, still water at your feet or by using a prism or a reflective surface to reflect the scene one or more times. "Reflecting when the subject is behind you", like catching a reflection off of a painting, mirror, or anything that shows what is behind you.

Shooting reflections can sometimes be challenging, but the key point to remember is: THE CLOSER YOU GO TO THE REFLECTIVE SURFACE THE MORE VIVID THE REFLECTION. If you’re able to use a video light or flash on your subject to brighten them up that will give you a more contrasty and dramatic photo.
08. Creating a short side of the face with flash
Short lighting is the situation whereby the side of the face furthest from the camera is illuminated and the side of the face closest to the camera is in shadow. Short lighting is extremely useful to thin a wide face or to simply make the subject look thinner using shadows. The shadow creates the short side of the face or more commonly referred to as the shadow side, or the sexy side. Many photographers will simply point their flash straight at the subject which is the quickest and easiest way to make your subject look horrible!
The easiest way to create a short side of the face on the subject is to look at which direction the subject's nose is pointing (even if its just ever so slightly) then turn your flash 90 degrees in that direction and allow the light to bounce off the wall (or anything light will bounce off - I’ve even used a little white salt shaker in the past and held it close to the flash head) and come back to flood your subject and thus creating a short side of the face.
09. Smoke and Mist
The use of coloured smoke in wedding photography has exploded over the last year or so with may photographers cracking out the smoke cans for something a little different. The key to shooting with smoke is to always ensure your flash is behind the smoke. Sounds pretty straightforward but if you get it wrong you’ll shoot yourself a wonderful smoky blown out frame! Set up your cameras and flashes first, then bring in your subject, get them sorted, crack the smoke making sure the smoke is behind the subject and won’t readily drift to them in a hurry.

You’ll probably also be needing some kind of light to illuminate them from the front unless you're going for a silhouette, in this case, I would use a modifier like a Selens grid to reduce the light spread from your flash. When shooting in mist its a slightly different ball game, the same principles apply to using smoke but you’ll find that because the mist is everywhere you’ll need to really reduce flash spread and also reduce the output intensity of light so as not to blow out the mist.
CONCLUSION
These are just a few techniques I use to create more impactful and engaging images and to help tell the story of the day in an interesting way.
I like to think of these techniques as special tools in my toolbox of photographic tricks, they can't really be used in every situation, however, when the opportunity presents itself to use them and create a photo for my couple that's unique and in line with their vision I’ll have the right tool in my head to do a world-class job!
Go out and have a go at all of these techniques and show us your results, we would love to see them.
Happy flashing!
Next Post
Alaska with Dr. Andrew Peacock
Previous Post
Highlights of White Nights with Ted's and Canon